[schema type=”recipe” name=”Hawaiian cake” author=”Rachel Howard” pubdate=”2013-09-01″ image=”http://www.sundaybaking.co.uk/wp-content/uploads/2013/09/Hawaiian-birthday-cake-700.jpg” description=”Hawaiian themed cake with Hibiscus and Frangipani flowers. Pineapple coconut and banana or chocolate cake. ” prephours=”2″ cookmins=”25″ yield=”10″ ]
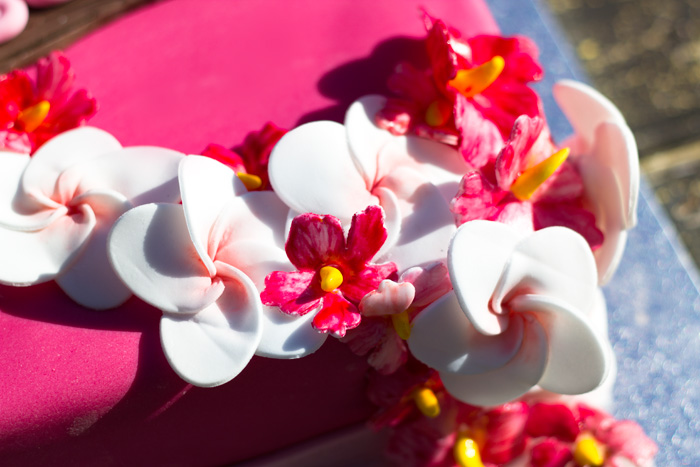
A while ago I was asked to make my first 1st Birthday cake…exciting! When I asked what type of cake they wanted the response was instant – A Hawaiian cake! The cake is for Lani which means Heavenly in Hawaiian.
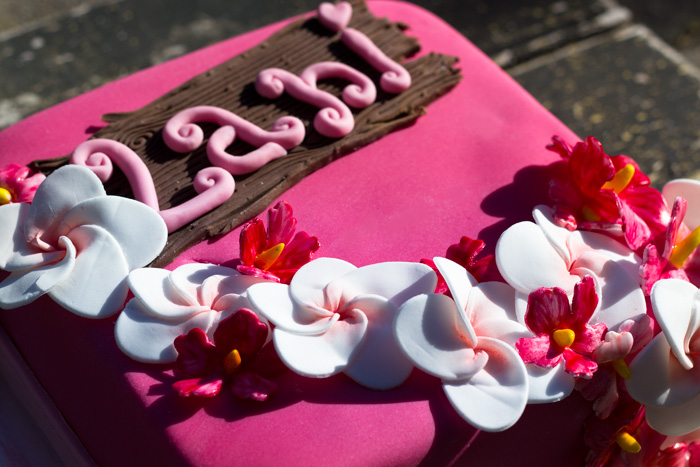
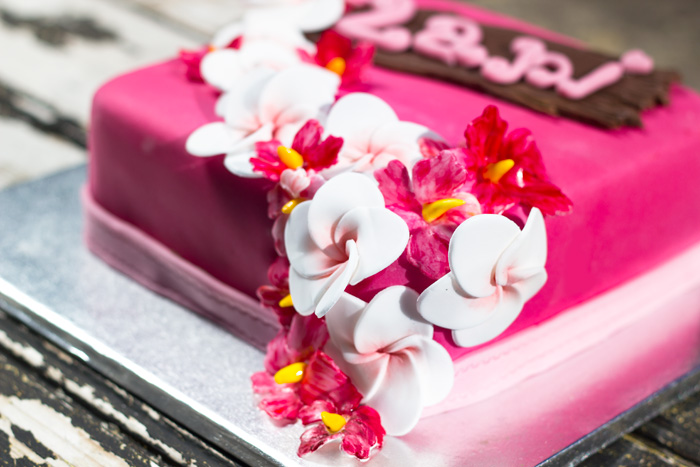
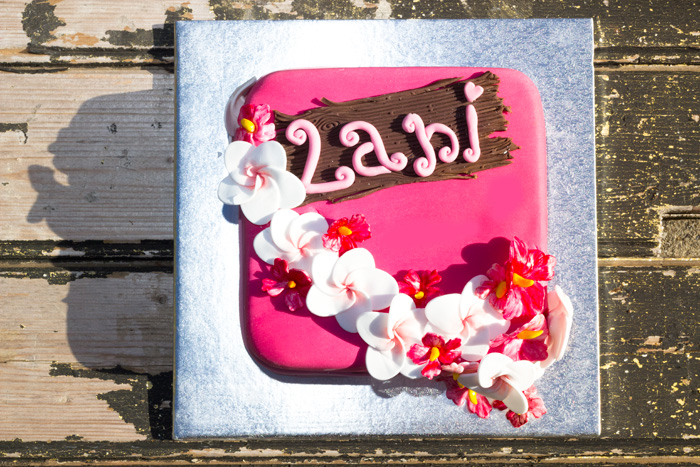
Lani’s mum had a look around and drew me an image of what she would like – a chocolate cake with Frangipani’s, Hawaiian Hibiscus’ and driftwood with her name on it.
I am not going to lie – this was all pretty daunting. I have never tried to make sugarpaste flowers before. I ordered a Hibiscus flower cutter but when it arrived the instructions said you needed loads of other things so I panicked – how am I going to do this?! Luckily my husband calmed me down (and then left me to it while he went and got beer…I think he thought he was in for a long night with tears and tantrums!!), I had a go and slowly they started working. Woop….now I can enjoy making this (no tears and tantrums this time!)!
[callout title=For the Flowers]
- Rose Petal cutter (I didn’t have time to get one so I actually used an oval biscuit cutter)
- Hibiscus Flower cutter
- Pink Dusting colour (Or any colour you want in the middle of the Frangipani’s)
- White Flower Paste
- Pink and Yellow Gel Food Colouring (Or any colour you want to paint the Hibiscus Flowers)
- Small Paintbrush
- Rolling Pin
- A drying rack – can be anything!
[/callout]
I started with the Frangipani’s:
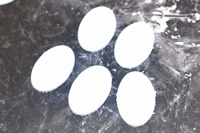
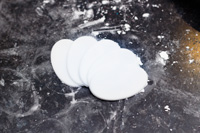
- Roll out the flower paste on a surface dusted with cornflour
- Cut out 5 petals
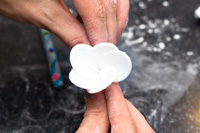
- With a bit of water, stick them together in a fan shape. Make sure they are nice and tight together – you want to cover about half of the petal next to it
- Leave it to dry for a few seconds
- Pick them up and roll them up in your hands. Squeeze the bottom together and secure the petals with a bit of water. Hold them for a few seconds while they set.
- Push the petals out and leave them to dry – preferably overnight if possible
- When dry, paint on a little dusting colour in the middle of the flower
Hibiscus Flowers:
- Roll out the flower paste on a surface dusted with cornflour
- Using the cutter, cut out the flower
- In your hands, squeeze the cut out shape at the bottom
- Roll up a small bit of paste to form the stem. Stick this in the middle with a little water
- Put the petals into the shape you want them in and then leave them to dry – again preferably overnight
- When dry, paint the flowers using colour gel and a splash of water. Again, leave to dry
To make the driftwood, I used a wood embossing mat and then roughed it up a bit along the edges with a sharp knife. And Lani’s name is just made using pink sugarpaste.
Putting it all together:
- Ice the cake with buttercream – don’t worry about how messy it looks – you are going to cover it all!
- Roll out the sugarpaste to your desired thickness and then lay it on the cake. Remember to smooth the icing in an upwards motion on the sides to prevent it from dragging down and breaking. Trim around the bottom.
- Polish the icing with a smoother (or your hand if you don’t have one)
- Carefully lie the driftwood on the cake. Secure with water or edible glue if you feel it needs extra support. Then place the name on top of this.
- If your icing is a little rough around the edges the best way to cover this is with ribbon secured with a pin. I made a ribon band using sugarpaste and covered the joins with Frangipani’s!
- Then place your flowers wherever you want them. I used edible glue to secure them and pressed them into the icing.
As requested, I made a chocolate cake and used the same cake recipe as my Pigs in Mud Cake and regular chocolate buttercream in the middle and around the outside to stick the icing to. However, if you wanted to make it more Hawaiian I would go for a Tropical Pineapple, Coconut and Banana one like this:
[callout title=Ingredients for the sponge]
- 420g plain flour
- 1 teaspoon baking soda
- 1 teaspoon ground cinnamon
- 1/2 teaspoon salt
- 220g vegetable oil
- 2 teaspoons pure vanilla extract
- 400g sugar
- 3 large eggs
- mashed ripe banana (about 3 large)
- 1 can crushed pineapple, drained
- 100g chopped walnuts, or pecans
- 100g desiccated coconut, unsweetened
[/callout]
Method:
- Preheat oven to 180C, with rack in the center. Butter two 9-by-2-inch round cake pans. Line the bottoms of the pans with parchment paper. Butter paper, and dust the pans with flour, tapping out any excess. Set aside.
- In a medium bowl, sift together flour, baking soda, cinnamon, and salt; set aside.
- In the bowl of an electric mixer, beat oil, vanilla, and sugar until combined, about 2 minutes. Add eggs one at a time, incorporating each before adding the next. Beat at medium speed until mixture is pale yellow and fluffy, about 3 minutes.
- In a medium bowl, mix together banana, pineapple, walnuts, and coconut. Add to egg mixture; stir until well combined. Add flour mixture; blend well.
- Divide batter between pans. Bake, rotating pans halfway through, until golden brown and a cake tester inserted in the center comes out clean, 30 to 40 minutes.
- Transfer pans to a greased wire rack. Let cool 15 minutes.
[callout title=Ingredients for the frosting]
- 450g cream cheese, room temperature
- 2 teaspoons pure vanilla extract
- 230g unsalted butter, cut into pieces, room temperature
- 900g icing sugar, sifted
[/callout]
Method:
- In the bowl of an electric mixer, beat cream cheese and vanilla until light and creamy, about 2 minutes. With mixer on medium speed, gradually add butter, beating until incorporated.
- Reduce mixer speed to low. Gradually add sugar, beating until incorporated.
- Using a spatula, spread frosting on one of the cakes and sandwich together. Frost sides and top of cake with remaining frosting
I really enjoyed putting this cake together when I realised that the flowers weren’t actually that hard to make. And I’m quite proud of the final result.
Happy Birthday Lani – have a great party and I hope you enjoy the cake! xxx
Well done Rachel – this looks great! I love making the flowers it’s sooo relaxing.
I’ve got a Peppa Pig cake request for the end of the month so watch this space! x
Thanks – yes when I got the hang of it it was a great cake to make! Ah Peppa Pig…I enjoyed that one too! Good Luck! x
I really like this recipe, i believe I am a good at bakeing but I think the problem is I haven’t got any recipies thanks heaps
If you follow Sunday Baking on Facebook you can make sure you don’t miss out on any new recipes too!