[schema type=”recipe” name=”Harry Potter Open Spell Book Birthday Cake” author=”Rachel Howard” pubdate=”2013-04-21″ image=”http://www.sundaybaking.co.uk/wp-content/uploads/2013/04/Harry-Potter-Cake-Full-on-angle-700.jpg” description=”Harry Potter open spell book birthday cake” prepmins=”30″ cookmins=”40″ yield=”20″ ]
So this is what I did yesterday morning!
I work with a beautiful young lady called Nadia and a few months ago she asked me to make her a ‘Snitch’ cake for her birthday. I was totally confused and looked at her quite blankly until she explained it’s a little flying ball from Harry Potter (I’m sure all you Harry Potter Fans are screaming at me right now telling me what it actually is as I’m sure my explanation isn’t too good). But she then decided to leave it up to me, so my brief was just to make a Harry Potter Cake for her themed party!
You have probably guessed this already, but I haven’t seen any of the films in full. I’ve seen a bit here and there but I don’t know any of the details. So I had to do a lot of internet searching to find something I was happy to attempt. This spell book kept coming up and I thought it looked like a fun cake to make so that’s what I settled on.
Nadia’s favourite cake flavour is chocolate so I made a simple tray bake chocolate cake, but you could make anything as the base for this.
[callout title=Ingredients for the sponge]
- 75g cocoa powder
- 200ml boiling water
- 3/4 tsp bicarbonate of soda
- 4 eggs
- 375g dark musovado sugar
- 175ml sunflower oil
- 1 tsp vanilla extract
- 275g self raising flour – sifted
[/callout]
Method:
- Preheat the oven to Gas Mark 4 / 180°C and grease a 23cm x 30cm x 5cm deep baking tin
- Mix the cocoa with the boiling water. Stir in the bicarbonate of soda and set aside to cool
- Whisk the eggs, sugar, oil and vanilla in a mixing bowl until blended
- Stir in the flour and the cocoa mixture until smooth
- Pour into the tin and bake for 30-40mins until risen and firm to touch
- Cool in the tin for 10mins then turn onto a wire rack to cool completely
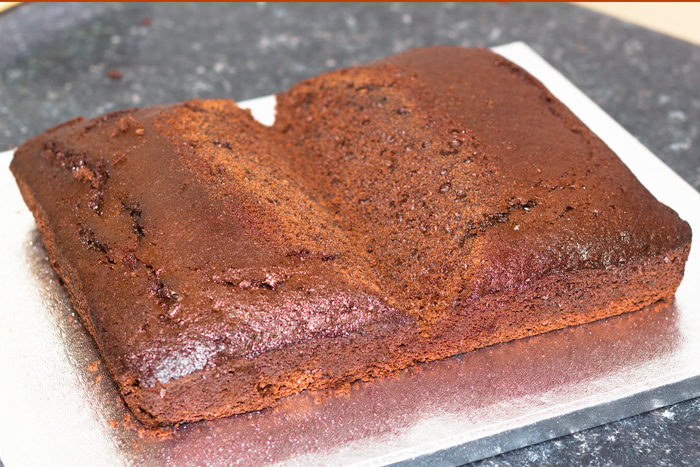
Once the cake has cooled, carve the shape of a book. I found the middle point and cut a line down it. Then I just took a sharp knife and carved the cake down into the middle line:
Once you are happy with the shape, make some frosting.
[callout title=Ingredients for the frosting]
- 450g icing sugar – sifted
- 150g unsalted butter – softened
- 60ml milk
- 60g cocoa powder – sifted
[/callout]
Method:
- In a freestanding electric mixer with the paddle attachment gradually mix together the icing sugar, cocoa powder and butter on a low speed until combined and there are no large lumps of butter
- Gradually add the milk into the frosting while mixing on a slow speed
- Turn the mixer up to a high speed and beat the frosting until light and fluffy
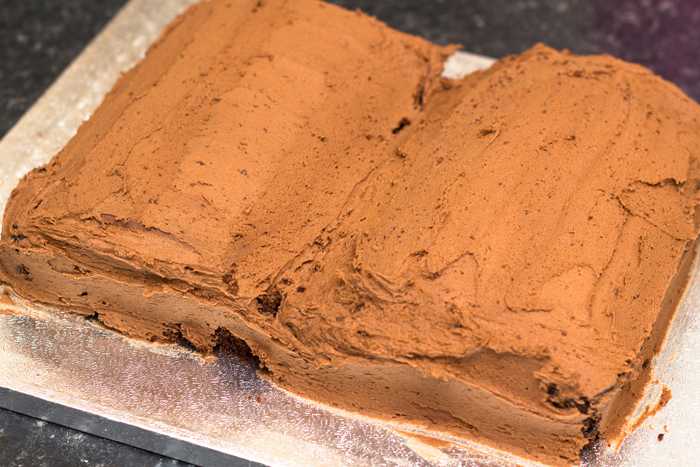
Spread this all over the cake. Don’t worry about making it neat and tidy as it will all be covered by fondant icing!:
[callout title=What you will need for the decorations]
- White fondant/ready to roll icing
- Cocoa powder
- Food colours – brown, red, yellow, gold
- Edible glue
- Icing for writing
[/callout]
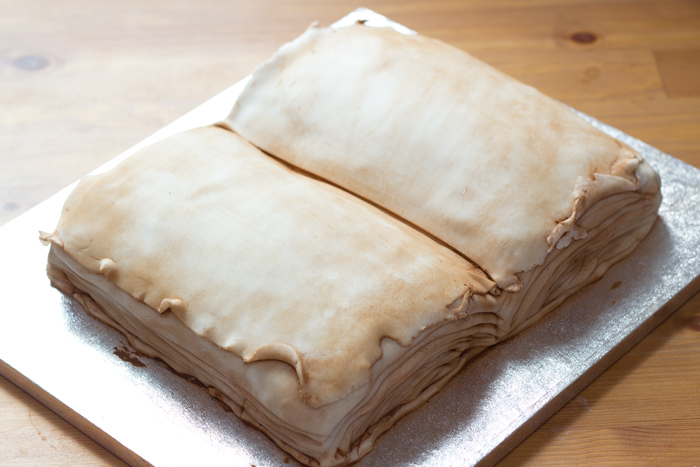
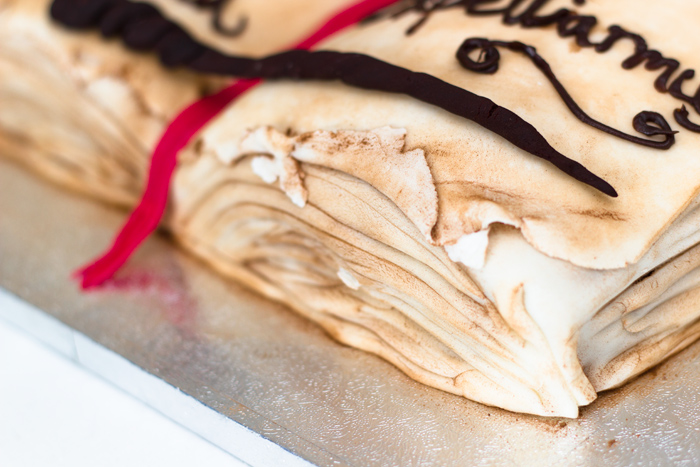
PAGES: Roll out the white fondant icing and drape over the cake. Press it into the middle of the cake to define the shape and then cut around the shape of the cake at the bottom. Brush on cocoa powder to create the ‘old’ look. I then rolled out another very thin layer of icing and placed this on the top. This means you can make the top page look more realistic by turning the pages at the corners. Brush with more cocoa powder. To make the page look along the edges just draw them in with something that’s really blunt. You don’t want to cut through the icing, just make an indent (although the odd cut doesn’t matter). Then brush with cocoa powder to create the definition.
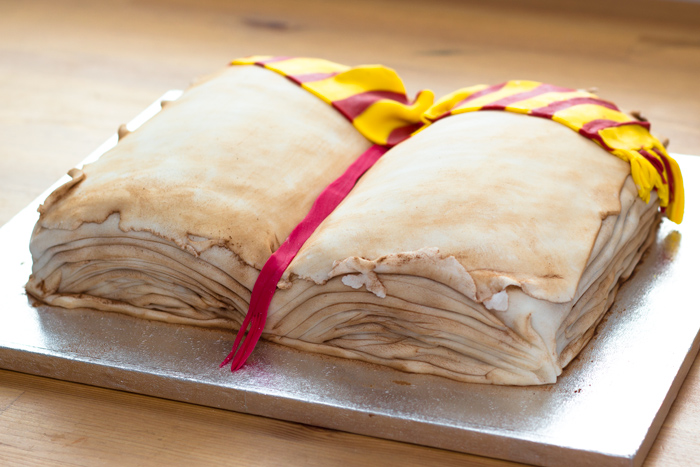
I then coloured a small piece of icing red to create a book mark.
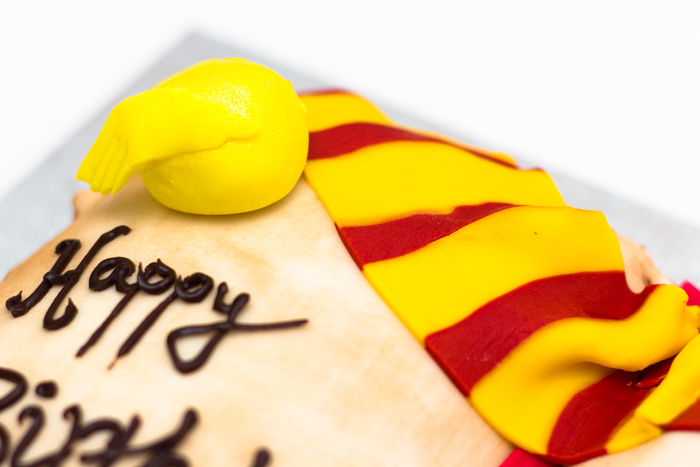
SCARF: To make the scarf I coloured some fondant icing – half red and half yellow. I cut them up into blocks, laid them next to each other and rolled them out so they joined together. I then cut a long strip to make the scarf shape and cut the frayed pieces into the end before placing onto the cake.
SNITCH: This is just a piece of fondant coloured with yellow and gold colouring rolled into a ball. I cut out wing shapes and then stuck them on using edible glue
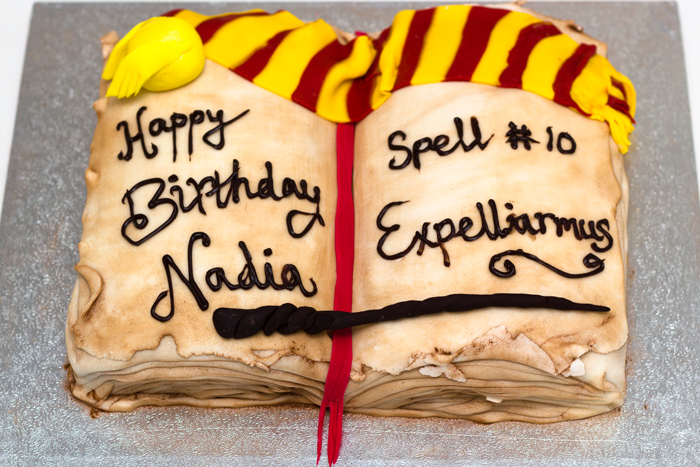
WAND: The wand is just some dark brown fondant icing rolled and twisted into a wand shape. I left it to dry on a board before I placed it on the cake to help it dry flat. I don’t think I left it long enough as it did bend after 5mins of being on the cake
WRITING: This is just piped on using a pre bought chocolate writing icing. I squeezed it out of the tube and into a piping bag as this gave me more control. I then piped on the birthday message and thought a spell on the other side would make it obvious that it was a book of spells!
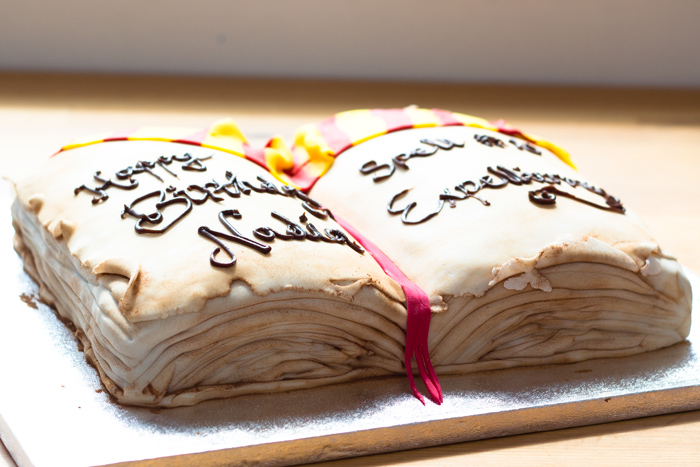
When I placed it all together, I have to admit I was pretty pleased with how it turned out! I saw a lot of book cakes on the internet and I was really worried about getting the pages looking right but I think I managed it well. And to be honest, I just did it really quickly as I thought if I did it too slowly and perfectly it would look too neat! And I used a lot of cocoa powder brushed over the top as this made a big difference to the way it looked.
Everyone at the party loved it. I didn’t stay long enough to see what people thought of the taste, but I had a sneaky piece of the cake I carved away so was pretty confident that it tasted ok too!
And after all the research, I think I’m now ready to sit down and watch the films!
If you try this, let me know how you get on and send me a photo…I’d love to see how it went!
“We did it, we bashed them, wee Potter’s the one, and Voldy’s gone moldy, so now let’s have fun!“
This is really amazing rach, the detail to make the pages is just brilliant! X x
amazing!!!!!!!!!!!!!!!!!!!!!!! the snitch is a little golden ball which is one of the most important balls in quiditch, the seeker needs to catch it. when the seeker catchs the ball the team gets 150 points and the game is over!!!!!!!!!!
Oh my goodness this is amazing! Now I just need to find an excuse to make it 🙂
Thank you. I’m sure you can find one!
Hi Rachel, im going to attempt to make this, I am a bit of a novice and was going to buy the coloured icing,how much white icing should I buy? I have absolutely no idea, thanks Fi
Hi Fiona
What size cake are you planning to make? This might help – http://www.cakedecoratingstore.co.uk/sugarpaste-marzipan-quantities-guide.html
Good luck!
How did you make the sides of the cake look like a book, did you put on loads of layers or just put one thick layer on and then made cuts into it? Sorry little confused, Thanks
Hi!
I laid a pretty thick layer of icing over the cake and then made cuts (without going all the way through) to make the pages. And then I rolled out a really think layer to go on top to make it look like a separate page on the top. Does that help?
How thick did you roll out the main layer of fondant icing?
thank you so so much for this! you made my life a million times easier today
Pleased I could help!!
Thank you so much for this recipe and step by step instructions. The cake turned out great and my daughter was so happy. I’ve linked back to your blog from mine 🙂
I’m so glad it helped you! I love your blog – thanks for linking!
Just made a book cake for stepsons 8th birthday, used some of your suggestions which worked fantastically thank you for posting!
now got to try and do a buttercream HP castle, that looks as good, for the other one (twins)!
Oh wow… Good luck! Glad my blog helped you with one of them!
This cake is amazing! The pages are impressive! It was a great idea to use cocoa powder, it gives so much definition. Well done!
You definitely have to read the books, they are much better than the movies.
Really good recipe.
Thank you very much for all the instructions, I had some problem making the scarf, but it really came out beautifully, my boy was delighted with it, we’ve just come back from the party!
I thought the sponge was going to be a bit dry but it really has been very good. I will subscribe to your blog to see what you do. Thanks a lot!!
thanks so much for this-I’m in the middle of making one based on your recipe for my daughters’ 7th birthday on Monday. So far the cake is iced, with the pages, scarf, and bookmark done, and the wand and snitch are drying separately to add to it tomorrow when I do the writing.
I’d live to share the pics so fare with you-where should I send them?
Thank you very much for sharing your instructions and beautiful photos of this impressive cake. I was struggling with ideas and was daunted by my daughter’s request for a Harry Potter cake for her birthday, but you’ve given me confidence and inspiration to plan something similar.
That’s great to hear! Good luck x
Had a go at this fab recipe. I’m not much of a baker and it was quite fiddly but your instructions were very clear and concise, many thanks my daughter loves it
Oh I’m so glad it worked for you!
I can’t thank you enough for the instructions for this cake. I am about to make it for the third year in a row, my daughter is still Harry Potter mad and only wants this cake again for her birthday. It has turned out amazingly well the last two years, lets hope I can do it again! Thank you!
Hi this looks absolutely adorable . I have never worked with fondant before and vandywas thinking of using it only to make the scarf , the snitch and the wand. My question was how much ahead of time can i make these . How do i store them. My daughters bday party is a fortnight away ?
Thank you so much
Hi! I don’t work with fondant too much so I wouldn’t consider myself an expert. I would say that if you are making them in advance, let them dry out before putting them in a container as they may get a bit sweaty otherwise. If you are intending on taking them off the cake before cutting you can make them whenever you need to, but if you want them to be cut with the cake I wouldn’t make them too far in advance. Hope it goes well!
What a great recipe. So easy to follow resulting in a cracking cake that my Harry Potter mad nieces will love. Thank you.